Kalamazoo Amp Field Guide:
Replacing a Speaker
DISCLAIMER:Tube amplifiers contain potentially lethal, high voltages even after they are unplugged, that may cause personal injury or death. Do not attempt to repair, modify, or work on any amplifier unless you are absolutely certain you know what you are doing.
NO GUARANTEEThese mods are all things I have tried, someone I know has tried, or are recommended by people who work on amplifiers for a living. Nevertheless, if you try any of these, you assume all responsibility for anything that happens, whether the amp explodes, you get zapped, or the amp suddenly increases in value because everyone falls in love with it. The glory, the pain, whatever, they're all yours. If you can't live with that, don't mess with the amp! |
To the best of my knowledge, nobody makes an exact replacement for any Kalamazoo speaker. But there are plenty of speakers that will sound great in these amps.
On the other hand, the Model One and Two speakers were probably a bit wimpy from the factory, but most today are worn out. Any upgrade will help. Justin Belshe recommends a Weber VST C10N. If I had the money, I'd try a couple of Webers, a Kendrick, and a Carvin, at least, and some of the newer Eminences, among others. Any 10" Weber similar to the old Jensen 10N to 10R range will probably sound reasonable, as will anything similar. The Weber VST AlNiCo Signature 10 and 10S work great in any of the Kalamazoo guitar amps, and are very reasonably priced. These will fit great into a Reveb 12 even with the bell cover, but you'll most likely need to leave the cover off in a Model One or Two.
When you get your new speaker, check it with a meter if you have one to make sure it's OK (especially if you bought a used speaker). Better yet, hook up a cable to it, and hook it to an amp and play through it. If it's bad, send it back now rather than installing it first!
Swapping the speakers is easy. First, desolder or cut the speaker wires where they are soldered to the old speaker lugs. I prefer soldering and crimping female spade connectors to the wires for attaching the new speaker. (This will let you more easily swap speakers in the future.) But make sure they grip the speaker's spade lugs tightly. Alternatively (or in addition), add a speaker jack to the amp and use a plug on the speaker wire.
From the back of the case, use a nut driver (or socket on an extension, or pliers if absolutely necessary) to loosen the nuts holding the speaker in place. Finish removing the nuts by hand if necessary.
Remove the old speaker and insert the new speaker, taking care not to poke holes in the cones with the screws). Reattach and tighten the nuts that hold the speaker in place. Get them snug, but don't distort the speaker frame or strip the nuts. (The original nuts are very thin and should strip before they can damage the speaker, but try to avoid even this!)
Slip the spade connectors onto the new speaker lugs, or if you refuse to use spade lugs, resolder the wires (not an optimal solution). Use an ohmmeter across the output transformer's primary leads; you should hear the speaker make a static sort of noise. If not, check the leads carefully; check the speaker impedance with the meter to make sure it works.
You're ready to go.
Speaker Jack
While you're in there, you probably want to install a speaker jack. First, drill a hole in the chassis (or elsewhere) to accept a 1/4" phone jack. Remove the speaker wires from the speaker, or cut them at the right length to reach the jack. On the speaker cable, pull the two wires apart for about an inch or so. Strip about 3/16" to 1/4" insulation from these wire ends, and solder them to the jack. Now prepare the ends of the wire to the speaker the same way (separate and strip), and solder them to a 1/4" phone plug, making sure the same color wire is ground on the plug as on the jack. Now you can plug your combo speaker in, or plug in an external cab.Some people really don't like drilling holes in the orginal chassis. If you don't want to do this for some reason, or if you want easier access to the jack, you can mount the jack on an L bracket (angle iron or aluminum work great). This can be bolted to the chassis, or somewhere out of the way in the cabinet.
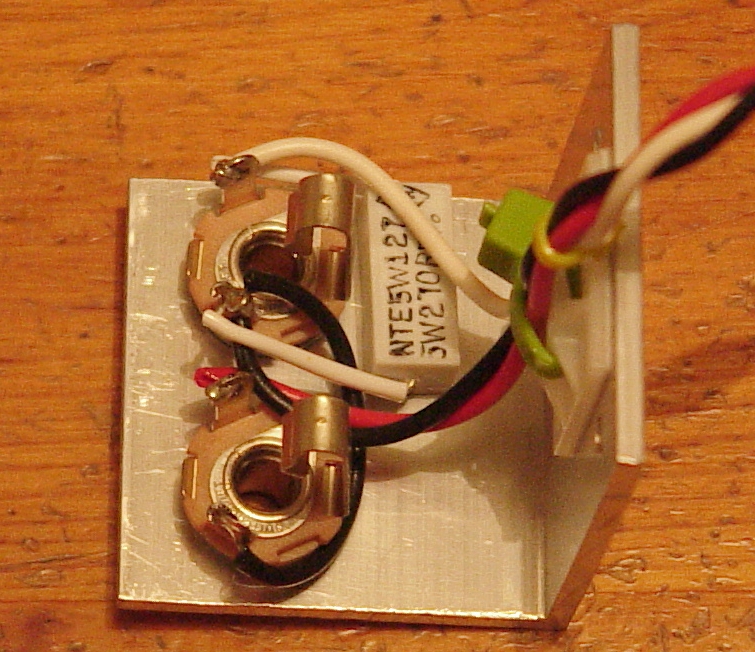 If you upgrade the output transformer (OT) to one that includes
multiple impedance taps, you can easily install multiple jacks
on an L bracket, one per impedance desired. The only danger
here is that there's no easy way to wire this with shorting
jacks to protect the output section from flyback in the event
of a disconnected speaker or bad speaker cable. In this case
you'll need to add a resistor (200 ohms / 5 watts is more than
enough for a 5 watt amp) between the lowest impedance tap and
ground. The AplJax[tm] setup in the photo has been made as
bulletproof as posible. The hand-braided cable has a cable tie
on each end of the cable itself, uses a stick-on cable tie
holder to attach the cable to the L bracket so the wires
can't easily pull loose, and includes the resistor described
above with heat shrink tubing over its leads to avoid shorts.
The resistor rests against the aluminum L bracket. The L
bracket attaches to the amp with bolts through three holes in
the side of the bracket the cable is attached to.
If you upgrade the output transformer (OT) to one that includes
multiple impedance taps, you can easily install multiple jacks
on an L bracket, one per impedance desired. The only danger
here is that there's no easy way to wire this with shorting
jacks to protect the output section from flyback in the event
of a disconnected speaker or bad speaker cable. In this case
you'll need to add a resistor (200 ohms / 5 watts is more than
enough for a 5 watt amp) between the lowest impedance tap and
ground. The AplJax[tm] setup in the photo has been made as
bulletproof as posible. The hand-braided cable has a cable tie
on each end of the cable itself, uses a stick-on cable tie
holder to attach the cable to the L bracket so the wires
can't easily pull loose, and includes the resistor described
above with heat shrink tubing over its leads to avoid shorts.
The resistor rests against the aluminum L bracket. The L
bracket attaches to the amp with bolts through three holes in
the side of the bracket the cable is attached to.
Phil Symonds suggested a "maximum flexibility mod":
``Maybe even consider two jacks on that L bracket. One between the OT and jack, the other between the speaker and jack. Maximum flexibility. Let the amp run another speaker; let the speaker be run by another amp. Use a jumper between the two jacks for normal operation.''If you wire it this way, you'll want to use a shorting jack on the OT jack.
External Speaker Jack
![[click for image]](Images/ext-jack.gif) As an alternative, you can leave the current speaker permanently wired,
with a jack that switches the internal speaker out when an external
speaker cabinet is used. This is an even better alternative, because
it doesn't provide a chance to run the amp without a speaker (which
will unusually fry your output transformer).
As an alternative, you can leave the current speaker permanently wired,
with a jack that switches the internal speaker out when an external
speaker cabinet is used. This is an even better alternative, because
it doesn't provide a chance to run the amp without a speaker (which
will unusually fry your output transformer).
Wire the OT and speaker grounds (return) to the ring (outer connector).
Wire the other OT lead to the tip connector. Wire the other speaker
lead to the switch connector. When no plug is in the jack, the switch
will close against the tip connector, letting your internal speaker
work.
When you plug in the cab, it opens that switch, disconnecting the
internal speaker, but leaving voltage across the tip and ground, where
the cab's plug is connected.
Thanks!
Special thanks to Justin Belshe <JBelshe@AOL.com> (who would like to thank Tim Swartz <TimTube@AOL.com>) for lots of ideas on rebuilding this amp.
Last updated: 23 March 2006
Copyright Y2K Miles O'Neal, Austin, TX. All rights reserved. Miles O'Neal <roadkills.r.us@XYZZY.gmail.com> [remove the "XYZZY." to make things work!] c/o RNN / 1705 Oak Forest Dr / Round Rock, TX / 78681-1514